How To Create Dynamic Countdown Timer Messages Using Power Automate
I recently planned an event (side note, event planning is exhausting) that had a lot of moving parts, participants, and busy people on the planning team. To help us stay on track, I created automated reminders of how long we had until event day using Power Automate. Here’s how to do that.
Craft Your Message Variable
For simplicity, you’ll want to use the “initialize a variable” action to store your countdown message. This will make it easier to send your message later on in your connector of choice (Teams, Outlook, Slack, Gmail, etc.). Throughout this article, my screenshots of results are in Microsoft Teams.
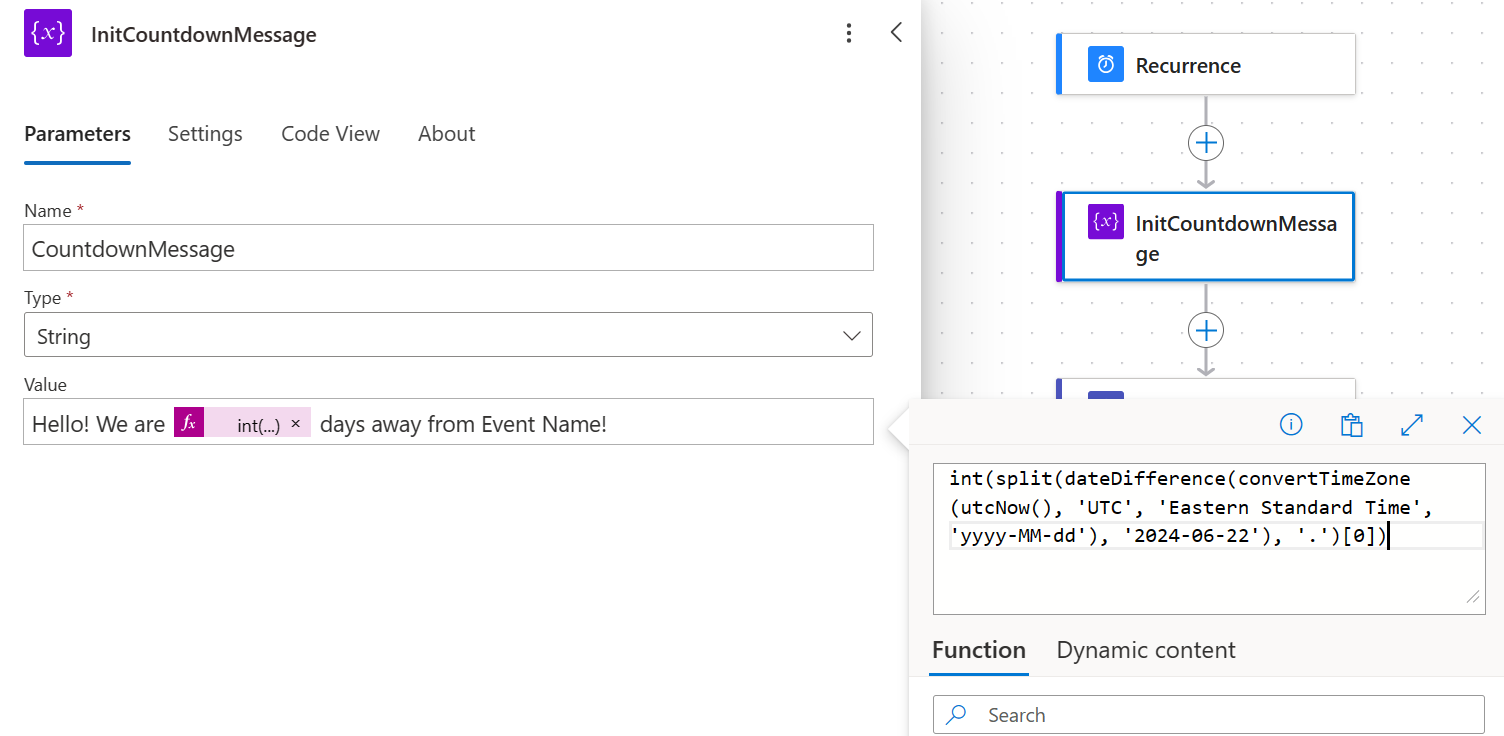
Here’s how you could initialize a variable to get started. Change the time zone to whichever you’re in (options here), the date, which is 2024-06-22 in the example below, to the date of your event, and the language to reflect how you’d like to communicate.
Expression Code
Hello! We are @{int(split(dateDifference(convertTimeZone(utcNow(), 'UTC', 'Eastern Standard Time', 'yyyy-MM-dd'), '2024-06-22'), '.')[0])} days away from Event Name!
Screenshots


Explanation
Here’s what’s going on in that code.
-
utcNow(): Returns the current date and time in UTC as a timestamp. It does not take any parameters. utcNow() documentation. -
convertTimeZone(): Converts the time from one timezone to another. In this expression, it’s converting the current UTC time to ‘Eastern Standard Time’. The formatyyyy-MM-ddensures the date is outputted in a specific format (Year-Month-Day). convertTimeZone() documentation. -
dateDifference(): Calculates the difference between two dates. Here, it’s used to find the difference between the current date (in Eastern Standard Time) and the event date2024-06-22. The result is a string representing the time difference in ISO 8601 format. dateDifference() documentation. -
split(): ThedateDifference()function returns the difference in a format that includes days, hours, etc., separated by periods.split()is used to divide this string into an array using ‘.’ as the delimiter, effectively isolating the days from the rest of the time units. split() documentation. -
int(): Converts the string representation of the number of days (the first element of the array created bysplit()) into an integer. This is necessary to remove any leading zeros and ensure that the message displays a clean number. int() documentation
To summarize, this expression dynamically calculates the number of days remaining until 2024-06-22, converts this number into an integer, and embeds it into a friendly message indicating how many days are left until the event.
Adding More Detail
If you want to get even more granular and include the days, minutes, hours, and seconds until your target date, you’ll need to start by making a variable to hold the results of calling dateDifference(). This will make it easier to parse the results in an expression that’ll need more than just the “days” until your event date.
Initialize a Date Difference Variable
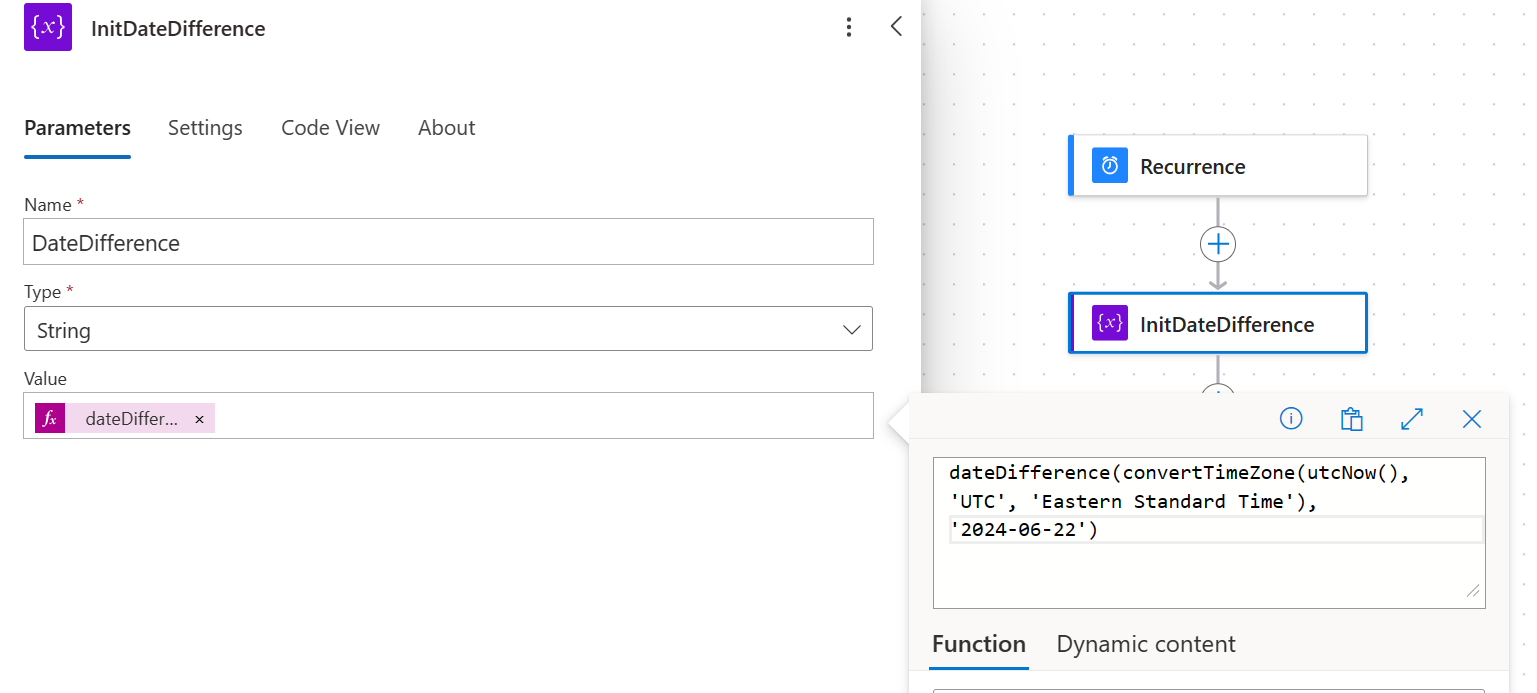
Create a variable called DateDifference (or really, whatever you want) with the expression code that’ll produce a timespan representing the time between the now and your event complete with days, hours, minutes, and seconds. Remember to change the time zone and date to reflect your values.
Expression Code
dateDifference(
  convertTimeZone(utcNow(), 'UTC', 'Eastern Standard Time'),
  '2024-06-22'
)
Screenshots

Set Your Countdown Message
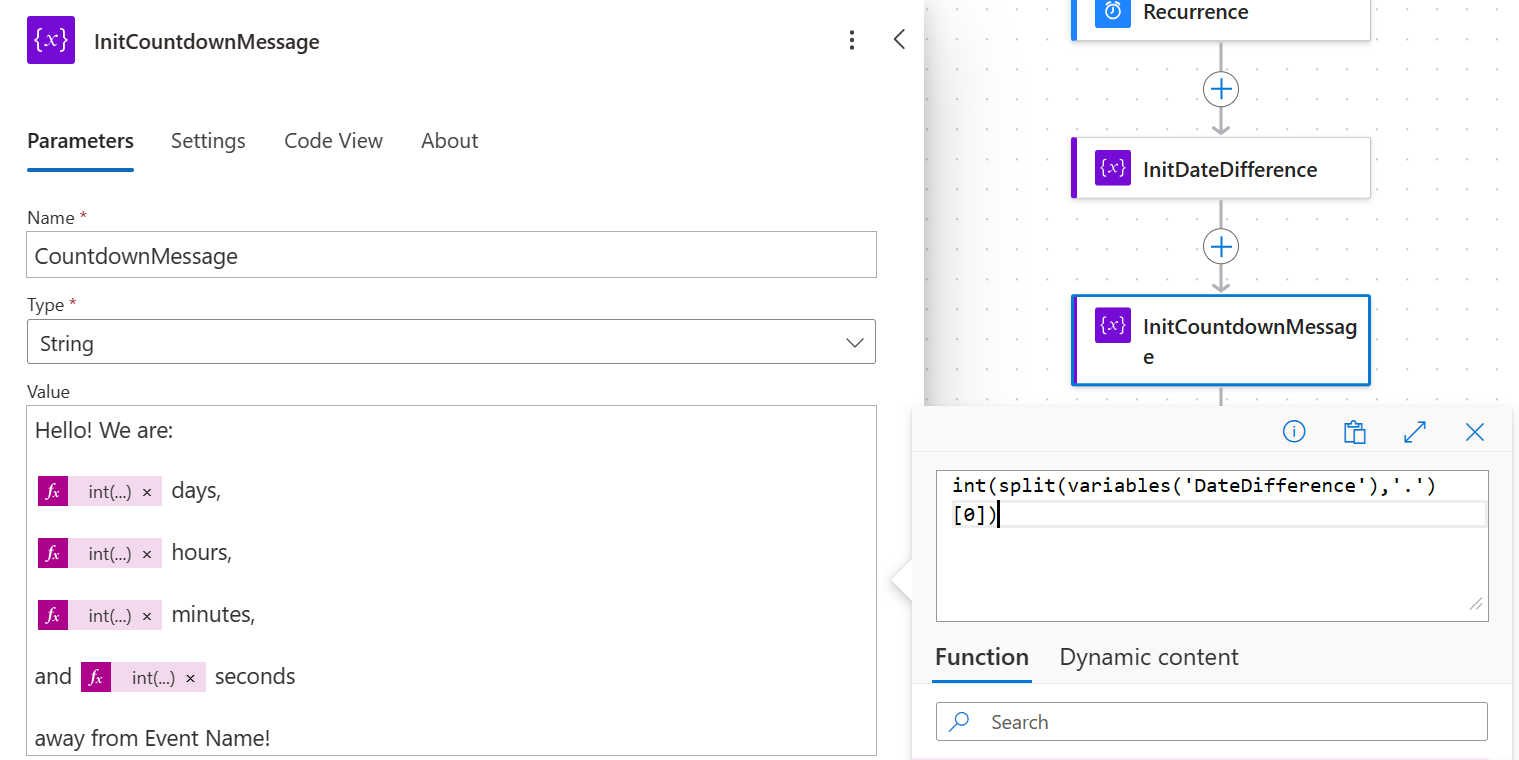
Next, set the CountdownMessage variable by parsing the timespan value returned by DateDifference for days, hours, minutes, and seconds.
Expression Code
Hello! We are:

@{int(split(variables('DateDifference'),'.')[0])} days,

@{int(split(split(variables('DateDifference'),'.')[1],':')[0])} hours,

@{int(split(split(variables('DateDifference'),'.')[1],':')[1])} minutes,

and @{int(split(split(variables('DateDifference'),'.')[1],':')[2])} seconds

away from Event Name!
Screenshots


Explanation
To understand this code, let’s use an example. A DateDifference value of 3.15:30:45 represents a timespan of 3 days, 15 hours, 30 minutes, and 45 seconds until the event. The expression code breaks down this value to populate the countdown message accurately. Here’s how the code would parse this timespan.
-
Extracting Days:
split(variables('DateDifference'),'.')[0]isolates3from3.15:30:45. The split function cuts the string at the period (‘.’), and [0] picks the first element of the resulting array, which is the number of days. -
Extracting Hours:
split(split(variables('DateDifference'),'.')[1],':')[0]first takes15:30:45(the part after the period in3.15:30:45) and then splits it at the colon (‘:’), selecting the first element[0]which represents hours,15. -
Extracting Minutes:
split(split(variables('DateDifference'),'.')[1],':')[1]follows a similar pattern to hours, but this time, it selects the second element[1]from the split operation, which yields30minutes. -
Extracting Seconds:
split(split(variables('DateDifference'),'.')[1],':')[2]takes the third element[2]after splitting by colon, giving us45, the number of seconds remaining.
Formatting The Message
If you want a part of your message to be bolded in red, here’s how to do that. This will only work if your final connector is a service that accepts HTML formatting in the body (such as Outlook, Teams, Gmail, and Slack).
Expression Code
Here’s a basic version of the countdown message with “days until” in bolded red text.
Hello! We are <div style="color:red;font-weight:bold">@{int(split(dateDifference(convertTimeZone(utcNow(), 'UTC', 'Eastern Standard Time', 'yyyy-MM-dd'), '2024-06-22'), '.')[0])}</div> days away from Event Name!
Here’s a detailed version of the countdown message with “days, hours, minutes, and seconds until” in bolded red text.
Hello! We are:<div style="color:red; font-weight:bold">

@{int(split(variables('DateDifference'),'.')[0])} days,

@{int(split(split(variables('DateDifference'),'.')[1],':')[0])} hours,

@{int(split(split(variables('DateDifference'),'.')[1],':')[1])} minutes,

and @{int(split(split(variables('DateDifference'),'.')[1],':')[2])} seconds

</div> away from Event Name!
Screenshots


Send Your Message
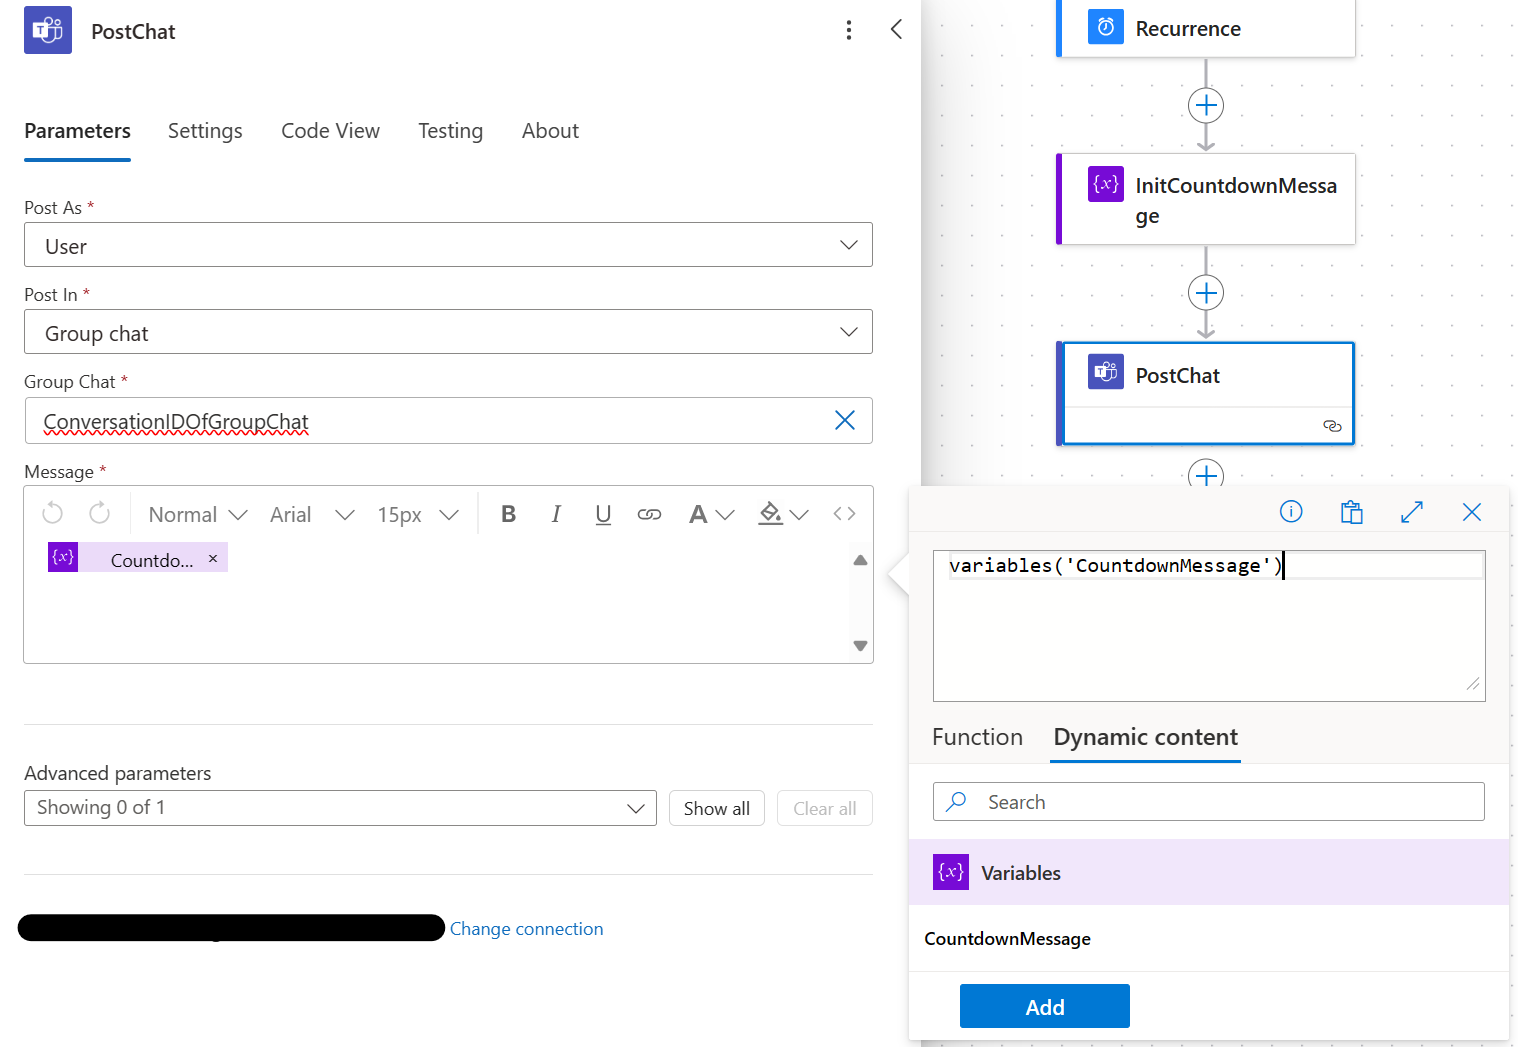
Take the CountdownMessage variable you initialized (or whatever you called yours) and throw it into the body of the connector you’re using to send messages (e.g. Teams, Outlook, Slack, Gmail). Here’s an example using Microsoft Teams.
Screenshots

Conclusion
I think Power Automate could benefit from a built-in countdown timer action. What I’ve described here works but certainly has some inconveniences. Anyways, that’s all folks. I hope whatever you’re counting down to goes well!


